Monday, 30 March 2015

Baby Led Weaning :: At 6 Months ::


We've been at this weaning business for about 4 weeks now. We started earlier than I had hoped at 24 weeks, because Effie was just so eager and ready to get at it.
For a good week or more before we started, we had her sitting at the table with us with a spoon and empty cup, so she could start to learn what it is we do at mealtimes.


Before we had Milo we were terrible 'eat on our lap' types, but now we eat every meal together when we're all home, at the dinner table. I love it and though getting a meal on the table for 5.30 whilst looking after two children and attempting to get homework done and all the other million jobs that seem to need doing between 3.30 and 5.30, means I've come to really dislike cooking dinner, I love the time we all have together. Sitting round the table eating and talking about our days, is a wonderful thing made even more so now Effie can join us.
If you haven't heard of baby led weaning before, you can read more about it's principles here, but basically it's the concept of allowing you child to choose the food they eat, versus spoon feeding them. So your baby is presented with some easy to handle, easy to gum, foods and you leave them to it (supervised of course). There are so many benefits to this way of weaning and it is currently the method recommended by heath visitors.
One of the best benefits to me is; less work! Effie just has a little of whatever we're having. Holding off the salt is the only difficult thing I found about this. Moving the salt I use for cooking away from it's usual spot has been helpful in stopping me adding a sprinkle every time I boil a pan.
Last week for instance we had a roast, Effie sampled everything accept the meat and the gravy. Meaning she ate, sweet potato, parsnips, celeriac mash, broccoli, green beans and yorkshire pudding. And she loved it!


The other benefit is the baby gets to experience all the individual flavours and textures of different foods. Rather than just one generic texture; puree. I don't know if there's any evidence to prove this but my theory is that this makes for less fussy eaters. By experiencing all the foods early on, I assume children will be more willing to accept new textures and flavours as they grow.

It also helps develop muscles in the mouth and tongue, through the act of chewing and moving the food around in their mouths, which means they are able to create a wide variety of sounds sooner. Which is believed to aid earlier communication.

The biggest pro for this way of weaning for me is, it's fun! Oh so much fun! For all of us. We love watching Effie choose what she's going for next, struggle to get a grasp of it, then congratulate her when she manages. She loves feeling part of what we're doing, watching everyone else and mimicking our chewing actions.
It also means I can actually eat my dinner now and whilst it's still hot. I've spent the last 6 months eating one handed with a baby on my lap, more frequently attached to my breast. If I was spoon feeding, eating would still be a one handed endeavour for me.

Everything about this form of weaning is perfect for us. I'm passionate about it's benefits and so glad that it is now the recommended weaning method. When I had Milo it was still a little bit of a strange approach for some. But we did it our way then and I'm so glad we id. At (almost) 6, Milo is the least fussy child I've ever met when it comes to food. He'll eat anything and is always so eager to try new things.

Here are a few of the foods Effie is especially fond of so far, if you were thinking of doing baby led weaning yourself these are great foods to get your little one going. I cut everything into chip shapes, so it's easy for her to get a grip on. I got myself a crinkle cutter, which I use to cut everything up, so she can get a little bit of a better grip on them. With the banana, I cut them into 3 pieces, then separate each length into 3 pieces, along the natural split in the banana, since discovering this tip our banana eating world has been changed forever!

  • Melon
  • Watermelon
  • Mango
  • Pear (nice and ripe)
  • Banana
  • Cucumber
  • Carrot (steamed or roasted)
  • Sweet Potato (steamed or roasted)
  • Broccoli (steamed)
  • Green Beans (steamed)
  • Pepper (roasted)
  • Rice Cakes
I recently found a post I wrote about weaning back when Milo was 10 months old over here if you're interested.


Friday, 27 March 2015

Time Flies ::

Oh my time is slipping away from me at the moment. I just wanted to pop in and apologise for this weeks silence. I had grand plans for blog posts this week, some Easter crafting, a join as you go granny square post and a little baby led weaning update, but somehow it's Friday already and Milo has now finished school for the holidays. Life has been a little hectic this week and there may well be changes in the works, but I promise to deliver all the above mentioned posts within the next week (now I've promised it, I have to do it see?!).

Here's my, later than planned Monday Mini Movie, inspired by Xanthe Berekely, from last weekend's happenings.


March 21st from vicki brown on Vimeo.

Saturday, 21 March 2015

Finding Inspiration :: Easter Crafts for Kids ::


With spring equinox yesterday and the sunshine starting to warm up, I'm getting super excited for Easter now, with only 4 days of school left until the holidays begin we're thinking about ways to fill our days with springtime themed crafts. I've been spending a lot of time over on pinterest gathering ideas for activities for Milo and I to get stuck in to and decorate our home. Here are some of my favourites ::

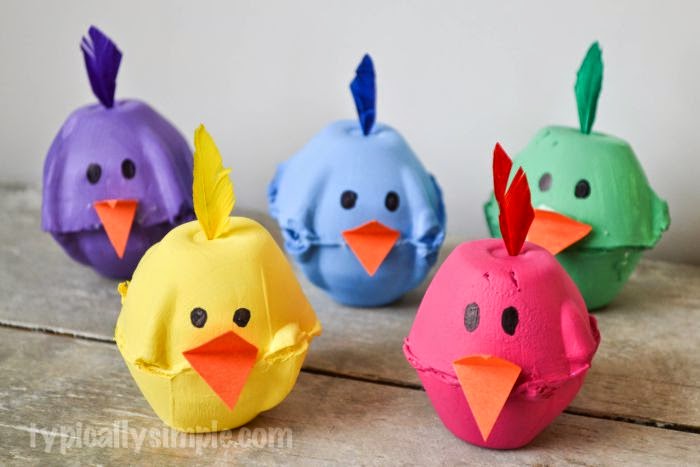
Spring chicks made from egg cartons, by Typically Simple ::


Pom Pom tree by wayaiulandia ::

Pom Pom tree

Salt Dough Eggs by Design Mom ::


Pom Pom Chicks by Crafts Unleashed ::


Shaving Cream Easter Egg Cards by Little Wonder's Days ::


Egg Carton Wreath by Homemade Serenity ::


DIY daffodils by Mend and Make New ::


Hatching Chicks from Little Foundations ::


You can see more Easter inspiration over on my Easter board on pinterest.

Friday, 20 March 2015

6 Months ::

Half a year! What a fabulous half a year it's been. She has changed so much this past month. Very much a world away from that newborn stage now. She's chatty and smiley and inquisitive and generally a pure delight.


We started experimenting with food this past month. Sooner that I would have liked, but she was so eager. I'll write more about how that's been going soon, but needless to say it's fun and messy in equal measure.


I feel like we're finally getting somewhere with sleep now. The main trick I have discovered is not to feed her to sleep. This seems to be a recipe for disaster as then transferring her usually results in a tired, grumpy, wide awake baby. However if I put her down whilst she's awake but showing signs of tiredness she'll gurgle at her mobile, snuggle her cuddly bunny and drift off to sleep. I also realised that by bedtime she was much too tired which was making it tricky to get her to sleep. Now I'm enforcing an afternoon nap and we're having much better results. Also a bedtime routine is now firmly in place, whereas before it was a bit haphazard. All of these are obvious solutions really but sometimes you need a bit of a nudge to get there.


She's just approaching that fabulous stage where she can't move anywhere yet, but is plenty happy to just hang out with some toys. Making my days a little easier and my ability to get stuff done much better. Fingers crossed this lasts a little bit longer as next month my maternity leave ends and I'll need to start trying to do some work again.


Don't think there's much more to report this month, still no teeth but buckets of drool. Fingers crossed they make an appearance soon.

Thursday, 19 March 2015

Springtime Surprise Project ::

Back at the beginning of the year Lucy of Capture by Lucy, launched the Springtime Surprise Project, inspired by Oh Comely's Perfect Strangers Swap last year. The idea was simply to gather some lovely things to ship out to a stranger to make them smile. We were given a few details about our swap partner and a £5 budget, with the emphasis not on spending lots of money, but gathering thoughtful things.


I loved taking part in this so much! My swap partner was The Boy and Me. The little bio I received about her told, me she liked chocolate, reading and crochet. So I made a special trip to Waitrose to hunt out some fancy chocolate, as a chocolate lover myself, it was difficult not to blow my whole £5 on chocolate alone, but I resisted. I then purchased a couple of postcards and that was pretty much the whole £5 spent. However, I had lots of bits and pieces already at home I could add. I made a crochet hook (you can see my tutorial on how to make your own here), included some hand cream I got as a freebie, a little notebook I already had, some buttons and crochet patterns that had come free with magazines and set about wrapping them all up.


It was so much fun to put it all together and I loved doing it, but of course, this probably isn't even the best part, because you then receive a little package all wrapped up lovely from your swap buddy in return!


The Boy and Me did a fabulous job of putting together such perfect little gifts for me, all wrapped in purple inside a sparkly gold box. There were beautiful buttons, a whole bag of them, plus a little box of bottles all filled with yet more buttons, a gorgeous little notebook, I've already begun filling with plans and ideas, a pair of stork scissors and these wonderful little frames, I have no idea what to use them for yet, but my mind is buzzing with crafty plans. Also, not pictured with everything else, because I had already proudly put it on my desk, is this lovely flower covered stone. I absolutely adore the little flower and leaves, so perfect and thoughtful.


Obviously this round is all finished up now, but I think Lucy may be organising another in the future, so if you'd like to take part you can sign up here.

G Nappies :: A Review ::

When it comes to nappies, we're pretty much stuck in our ways I'll admit. I tried so many different cloth varieties when Milo was a baby and one thing I learned quick, is that pretty doesn't usually mean efficient. We love motherease one size, which I tend to pair with Tots Bots wraps, this combination came to be as when I bought my stash of motherease off eBay, they came with a couple of Tots Bots wraps, they worked, there didn't seem much need to mess with that system. I have all manner of all in ones and pocket nappies, we use them occasionally but I'm always wary of leaking, because they so often do and nobody wants leaky nappies. There is one downside of my beloved motherease, they are massive! Especially on my wee little dot, as she grows they'll of course become less bulky, but at the moment, she does look a little bottom heavy.


I've had my eye on the gorgeous gNappies for a while now, so many of the lovely mama's I follow on instagram use them and they look so slim. I also really loved the look of the soft cloth cover. So when they offered to send me one to try out I jumped at the chance.

gNappies work as both a disposable or a reusable nappy, depending on the type of the insert you decide to use, the outer (the gPants) are reusable and you get two types of insert, disposable and washable. The benefit of using disposable nappies this way is that they're compostable, there's a lot less washing than full cloth and to be honest if you're not doing nappy washes anyway I have no doubt you can just pop them in the wash with the rest of your clothes. So far I've not had any incidents where the pants part has been especially dirty. Then you can simply compost the disposable part (wet only). This is fabulous, because anyone with a compost heap knows the best way to get that compost heap composting is by adding some wee to it! So I'm hoping adding the nappies will have the same effect!

I haven't used the cloth inserts so I can't comment on them, therefore my all my opinions relate to the disposable inserts.

When the nappy arrived I was thrilled with the look of the pants, I know it's silly to be concerned about the aesthetics of a nappy, but people really really do get quite emotional about these things. I opted for green and it's a lovely shade. The feel of the outside of the nappy is lovely and soft. I was surprised at how massive the disposable inserts looked compared to the pants, I couldn't see how it would be possible for them to fit. But they do, and perfectly nicely too. With the pants part of the nappy you get an outside layer, which is soft jersey type fabric, with two fastenings on each side, these do up at the back of the nappy and the two little bits of velcro are fabulous. One thing I find really tricky with Effie's one size nappy wraps is getting them tight around her leg but not super tight around her tummy. The two tabs on the gNapppies make this problem much easier.
Then within the pants part you have a kind of hammock, I guess we'll call it, which is plastic, this is where the insert goes. Overall the nappies are super easy to use and put together. This hammock is also removable and you can buy extras, which would be super useful and save you a lot of washing.


As for wearing, the nappy fits perfectly, I guess this is the benefit of having sized nappies rather than one size, and it's so slim. Barely any bulkier than a disposable. It's also quite a lot lower on her tummy than lots of the cloth I have.

It took me 3 attempts at her wearing it for me to get a photo of her doing so, because she managed to fill it all 3 times almost immediately after I put it on her! I was really wary of leaking, because the first ever cloth nappies I purchased for Milo back when I was pregnant with him, were the Mothercare ones, which also came with a disposable insert option (I don't think they do these anymore). Those were terrible for leaking and almost put me off cloth for life. However so far, even though she's tried with all her might, the gNappies have not had any leakages for Effie. I'm so impressed with them. The little hammock bit does a fantastic job of holding it all place.


Overall I'm massively impressed with these nappies, I would definitely recommend them as an alternative to disposables. We're still using disposables overnight and I'm seriously considering switching to using these instead, they'd also be great for going away. In terms of cost they're definitely not the cheapest option, the disposable inserts work out at just over 22p each, plus you have the added cost of the gPants, which come it at 14.95 each and you'll need to add to your stash as your baby grows. However as with most cloth nappies I expect they have good resale value. For comparison purposes, the Naty nappies by Nature Babycare which are 70% biodegradable (but not compostable as far as I'm aware) come in at just under 22p a nappy and you don't have any added costs. However if you don't like the idea of adding more unnecessary waste to landfill but don't feel you can take on the washing cloth nappies involve, this is a fantastic solution. I shall definitely be adding some more gPants to our stash and trying out some of the washable inserts.
**we were kindly sent a pair of gPants and some disposable inserts to review but all thoughts are our own.

Tuesday, 17 March 2015

Circle Centred Crochet Granny Square :: A Pattern ::

Crochet this classic granny square with a circle centre, using this free pattern.

As I've been working on my crochet granny square blanket, as part of my series on how to design your own granny square blanket, I've got this particular granny square well committed to memory now! My heart centred granny square pattern is one of my most popular blog posts, so I thought you may like the pattern for this square too.

Crochet this classic granny square with a circle centre, using this free pattern.

The main square has 4 rounds and I've been finishing all of mine off with a round of regular granny square in white and joining them as I go, more on this soon. It's a nice, simple square, that looks classically granny, but with a little bit of a twist on the traditional square.

Monday, 16 March 2015

Tuesday, 10 March 2015

Design a Crochet Granny Blanket :: Part Two ::

This is part 2 of a series of blog posts I'm writing to explain how I design my crochet granny square blankets, you can see part 1 here.

Step by step instructions for designing your own motif crochet blanket.

When you've chosen your yarn and once you've done a little swatching and decided what motif you're going to go with for your blanket, it's time to do some maths. Don't worry, it's nothing too scary.

The first thing you need to think about is how big your blanket is going to be. Single, double, lap, king, maybe it's for a baby. I used this source for a list of sizes

how to design a crochet granny blanket

Next up, how big are your motifs? How are you going to join them? If you're going to use double crochet to join them together then your original motif size won't alter a lot, however if you're going to add another round of treble stitches to each square obviously this will make a big difference. I'm going to finish each square with a round of treble stitches in white and I'm going to use this round to join the squares together as I go. So when taking the measurement of my square I did it with the white border added. If you're going to block your squares you'll also need to do this before taking your measurement.

Once you have these two numbers, blanket size and square size you can work out how many squares you need, then you can weigh your motif to work out how much yarn you're going to need.

I have made a little spreadsheet you can download. You're welcome to use this to do all these sums for you, but I'll talk you through the sums so that you can also understand how these results are created.

Above you can see how the spreadsheet looks before you've entered any numbers. 
The first thing you need to do is plug in the numbers specific for your blanket. Firstly the details from your yarn, the grams and metres per ball as given on your ball band.


Next you need to add the size of the blanket you would like to make, so add your measurements to the line on the yellow table that reads 'Blanket Size' you can use whatever unit you like for this, whether it be cms or inches etc, but make sure you keep to the same unit for both your blanket measurement and your motif measurement. I recommend using cms but only because that's what I'm used to using myself. I'm aiming for a blanket that measures around 203cm x 228cm so these are the numbers I put in.
Next you add your motif size, my motif is square and measures 17cm x 17cm, so these numbers go in your yellow table where it reads 'Motif Size'.
In the second to last row you'll now be able to see how many motifs you need to make your blanket, this is a rounded number, as it's unlikely the size of your motif will fit exactly into the size you're hoping for, therefore in the row marked 'Finished Size' you can see what the measurements will be with the actual motif quantity.

So now we know how many motif's we need to make, but how much yarn do you need to buy?

There are two ways of working this out and I actually used both for my calculations. For the 6 colours that make up the main part of my motifs, I used the weight and for the white that surrounds my squares and joins them all together I used the length of the yarn used.


To calculate with the weight of your motif use the red table as follows; firstly weigh your motif using digital scales to get an accurate measurement. My squares, without the white border, weigh 15g so that's the measurement I enter in the first row of the table. As I aim to use 6 colours equally throughout the blanket I enter 6 in the second row. 
If you plan to use different amounts of each colour I'm afraid this table won't calculate that for you, but as you'll have the total number of balls needed, it shouldn't be too difficult to work out yourself. 


I calculated the quantity of white needed separately, as each square will have a round of this, therefore I will need white than any other colour. To do this I worked one round around my motif in white, then ripped it out! I then measured the length of the yarn I used. This measured 5.2 metres (520cms). Therefore this is the number that I put in the first row of the blue table. I'm only calculating for one colour here, so the second row is 1. I can now see that I need 12 balls of white yarn.

I now know that I need 8 balls of yarn in each of my 6 colours and 12 balls of yarn in white and I need to make a total of 156 motifs. Now to get to work on all those motifs!

Designing a crochet granny blanket

In the next part I will share the pattern for the motif I'm using and explain how I'm joining my motifs as I go.

You can see Part 1 of this series here.


Monday, 9 March 2015

Weekending ::

What a gloriously sunny weekend it was. It really feels like spring is here. It was so warm on Saturday we didn't even need our coats and I've even begun to hang washing on the line, pure bliss.

Due to the wonderful weather we spent a lot of time out and about this weekend, Saturday I took the babies to the library followed by lunch at Milo's favourite Smokey Joe's. Then on to meet Johnny at the barbers for haircuts for the boys.


Sunday morning we headed out early for the cinema, where we watched Planes, Fire and Rescue. You know, it was actually a lot better than I was expecting, I'm not a huge fan of those movies, though that may be due to the million and three times I've had the pleasure of watching the original Cars movie.
Followed by lunch at the fabulous Mexican place we've been meaning to visit for ages. It was so good and so reasonable too


I went for a run with Bex in the afternoon. It was super tough, I'm not sure why, but oh my it was. We've both been under the weather for various reasons the last few weeks and been missing runs here and there so I expect that may have something to do with it. I'm still keen to keep going though, partly because when we're not desperately trying to catch out breath it's lovely to see Bex and have a little gossip.

I've been joining in with Xanthe Berekely over on Instagram for #mondayminimovies inspired by the creating time capsules course. Making a little movie of our weekend to share on Monday. I'm really enjoying it, it's inspiring me to capture the little moments of our weekend and put it together in to a little 15 second clip. Here is this weeks ::


Monday Mini Movies :: March 7th from vicki brown on Vimeo.

Thursday, 5 March 2015

World Book Day ::

Happy world book day to you, if you don't have children you may not be aware of this momentous occasion, if you do have children you will probably acquaint those words with the dread of having to put together a book themed costume for your little one. I actually really like making costumes, we're just not all that great at getting them ready any sooner than the night before. The other thing is persuading your child to go as a book character, not their favourite T.V. character. I won't lie a lot of mum's break these rules, I expect half the girls will be Elsa today, but I try to stick vaguely to them. 
Previous costumes have included, Charlie Bucket, Batman, one of Captain Hook's pirates and Max (from Where the Wild Things Are and my favourite).


This year Milo wanted to be Harry Potter. I tried to convince him to be the Gruffalo (he has a fab Gruffalo costume) but he wasn't having it.

So in the spirit of previous years we waited until after school yesterday to do anything about it. We collected a stick on our way home to serve as a wand, mended his batman cape and added a ribbon fastener, created a pair of glasses out of cardboard and decorated a t-shirt!


I had intended to hunt out a tie, knit a scarf and get hold of appropriate attire but well, time, baby and all manner of other excuses. However we were recently sent some Fruit of the Loom t-shirts from Buy T-Shirts Online, so I figured this would be the perfect opportunity to put one to good use. Using a lego minifigure of Harry as a guide I drew on the v of his v-neck sweater, the badge and the tie and Milo coloured them in with some fabric paints.


I'm actually pretty impressed with our handy work, yes it could have been better if I had done it all myself, there wouldn't be so many black smudges for a start, but where would be the fun in that? With some lipstick in his forehead he was ready and mightily pleased with himself.  

Wednesday, 4 March 2015

How To :: Make Faceted Beads ::


I recently found myself experimenting with a new (to me) air dry clay by fimo, called Air Dry Light, that I picked up at Craft Hobby and Stitch a few weeks ago. I decided to make some of my geometric beads for painting, as I was making some I thought I'd share with you a little 'how to' so you can make your own if you so desire.

Make your own faceted beads from air dry clay.

They're really easy to make, look great and you can use any kind of air dry or polymer clay.

The air dry light I used is very odd, the finished result reminds me of polystyrene and it certainly is light. I quite like the effect. I decorated mine with sharpies, but actually I think if you were to use paints and varnish them you'd get a better result.

Monday, 2 March 2015

Weekending ::

A little bit of our weekend in pictures.

Mostly a quiet one, with lots of crochet, cuddles with the babies and good food.


Sunday, 1 March 2015

This Week ::

A round up of some of my favourite moments from my Instagram this week ::